Explaining this article without divulging specific product details may be a challenge, but I'll attempt to simplify it. The product is an embedded device that streams video packets over IP via multiple network interfaces, such as Ethernet, WiFi, or modems, and then bonds (aka, bonding) them on the server to produce clear video without artifacts.
The company's hardware team developed a new device with improved hardware peripherals to achieve certain objectives that the company's existing devices couldn't. The new device was highly anticipated, and time was of the essence.
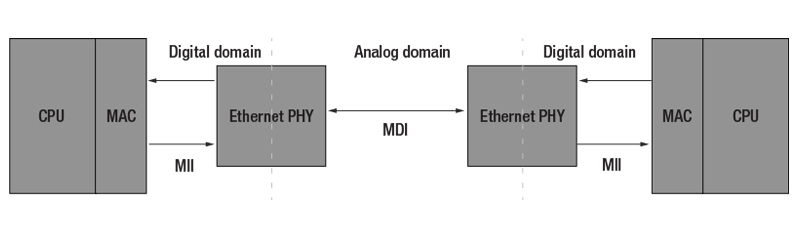
The new hardware architecture was based on something called PHY to PHY, which means the NIC of the board and the NIC of the video encoder were directly connected to each other, while the network interface was defined as VLAN to run a "keep-alive" traffic between the two. This architecture was entirely different than what out other products were designed.
This required some testing of course.
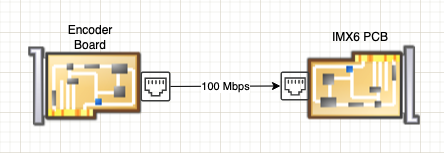
The test involved physically connecting the two PCB's evaluation boards with Ethernet cable (RJ45) and generating UDP/TCP traffic between them while measuring the board's CPU usage, network capability and packet losses.
The most common use case for the product was transmitting 100 Mbps of UDP packets from the encoder card to the main system board (IMX6 at the time). The IMX board was based on ARM architecture, and testing tools such as iperf and mpstat were added using the Buildroot toolchain to generate network traffic and monitor CPU usage.
Since this was an internal network connected physically, packet loss was unexpected.
So I started testing using Iperf
From the encoder:
iperf –c 0.0.0.1 –I 1 -u –b 100m –t 500 -p 9000
On the IMX board (receiving board):
iperf -s -l 9000
However, during a five-minute test, there were packet losses. In a video use case, video with losses results in artifacts, as shown in the example below.

Kinda bad right?
The company saved a significant amount of time by letting the QA team test the products on PCB evaluation boards before they were actually ready for testing, resulting in a new hardware revision. I don't know if your'e aware of the heavy cycle in terms on time and research it takes to fix an issue and make it ready for production in the hardware development world, but i'll give you a hint: It's far more than a software cycle.
The issue was eventually determined to be a hardware problem with the clock signal on the board.