Every team I've worked on eventually reaches the same point with E2E tests: they start as a handful of scripts someone wrote in a hurry, and six months later they're a tangled mess that breaks on every deploy. Tests duplicate locators, share state in weird ways, and nobody wants to touch them.
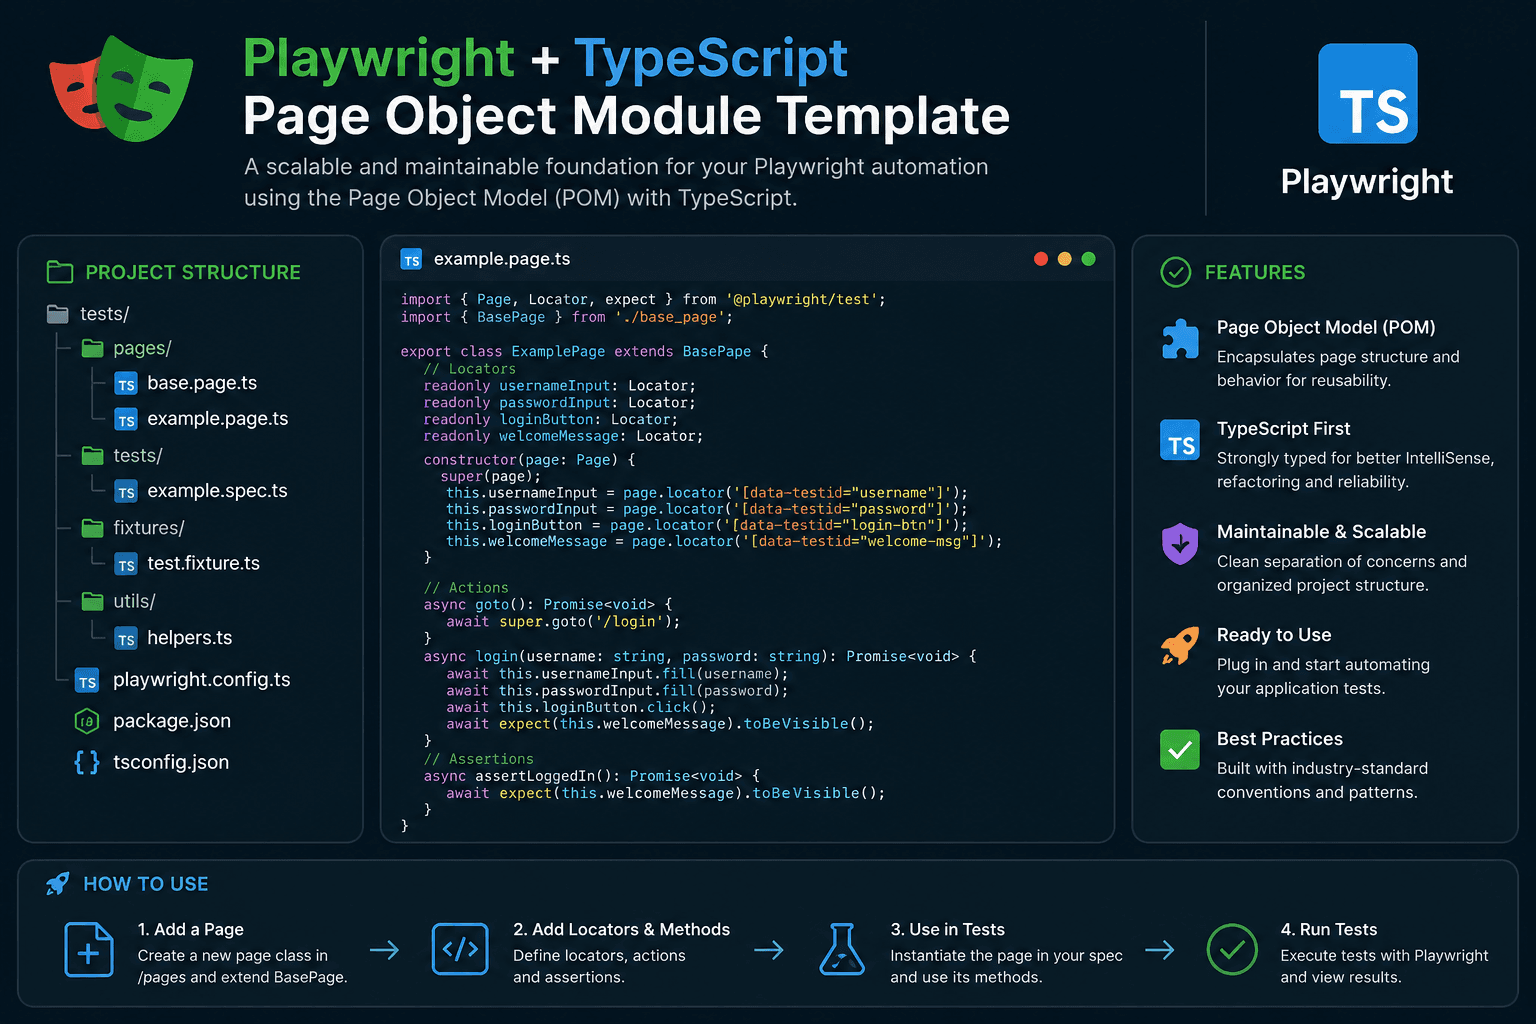
I got tired of rebuilding the same structure from scratch every time, so I built a template that captures the patterns I keep reaching for. It's open source and you can grab it here: playwright-ts-template-pom.
To be honest I wanted to do it for a while but never had the time to write it down. Nowdays with the assist from your favorite coding agent I finally did, and this post is the write-up of the design decisions, the architecture, and how each piece fits together.
This post walks through the design decisions, the architecture, and how each piece fits together. It's not a Playwright tutorial — the docs are excellent for that. This is about the layer on top: how to organize a real test suite that doesn't fall apart at scale.
Why Page Object Model?
The Page Object Model isn't new or exciting. That's kind of the point.
The idea is simple: every page in your app gets a class that owns all the locators and actions for that page. Tests never call page.locator() directly. Instead, they talk to the page object.
// Without POM — locators scattered everywhere
test('should display hero heading', async ({ page }) => {
  await page.goto('/')
  const heading = page.getByRole('heading', { level: 1 })
  await expect(heading).toBeVisible()
})

// With POM — clean, readable, maintainable
test('should display hero heading @sanity', async ({ homePage }) => {
  await homePage.navigate()
  await expect(homePage.heroTitle).toBeVisible()
})
When a UI element changes, you fix it in one place — the page object — not in thirty tests. I've seen teams waste entire sprints updating selectors across test files because they didn't have this separation. It's the single most impactful pattern in test automation, and it's boring in the best possible way.
The Architecture
Here's how everything is layered:
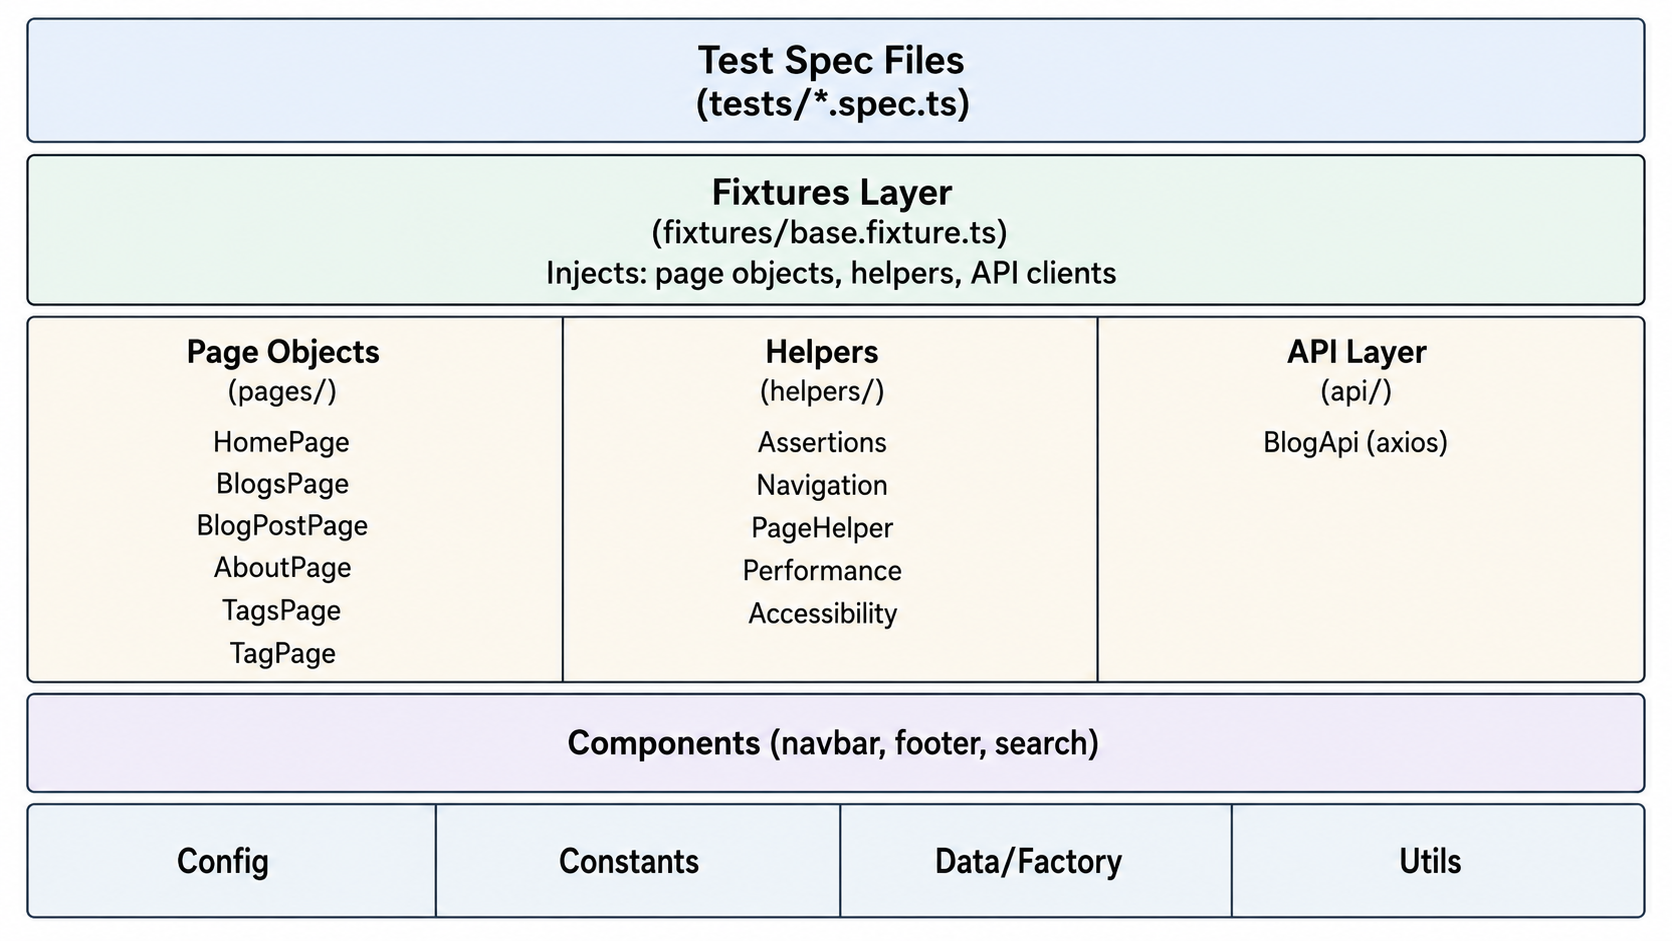
Tests sit at the top and only talk to the fixtures layer. Fixtures inject page objects, helpers, and API clients. Page objects compose shared components (like the navbar and footer). Everything below is infrastructure that tests don't need to know about.
This layering means a test file looks like a specification, not like Playwright API calls stitched together.
Fixtures Are the Glue
Playwright's fixture system is one of its best features, and it's the backbone of this template. Instead of manually creating page objects in every test, they're injected automatically:
import { test as base } from '@playwright/test'
import { HomePage } from '../pages/home.page'
import { AssertionsHelper } from '../helpers/assertions.helper'

export const test = base.extend<TestFixtures>({
  homePage: async ({ page }, use) => {
    await use(new HomePage(page))
  },
  assertions: async ({ page }, use) => {
    await use(new AssertionsHelper(page))
  },
  blogApi: async ({}, use) => {
    await use(new BlogApi())
  },
  // ... 11 fixtures total
})
Every test destructures exactly what it needs. No global setup, no shared mutable state, no import chains. If a test needs the homepage and the assertions helper, it asks for them. If it only needs the API client, it asks for that. Playwright handles lifecycle and teardown.
This is dependency injection done right — lightweight, explicit, and type-safe.
Components: Shared UI Pieces
Most apps have elements that appear on every page — a navbar, a footer, a search bar. In the template, these are modeled as components that get composed into page objects through a base class:
export abstract class BasePage {
  readonly navbar: NavbarComponent
  readonly footer: FooterComponent

  constructor(protected readonly page: Page) {
    this.navbar = new NavbarComponent(page)
    this.footer = new FooterComponent(page)
  }

  abstract get path(): string

  async navigate(): Promise<void> {
    await this.page.goto(this.path)
    await this.page.waitForLoadState('domcontentloaded')
  }
}
Every page object extends BasePage, so every page automatically has access to navbar and footer actions. No duplication, no forgetting to initialize them.
Helpers: Reusable Assertions and Utilities
Raw expect() calls work fine, but they get repetitive. The template includes helpers that wrap common assertion patterns:
// Domain-specific assertions
await assertions.assertNoImageErrors() // Checks every <img> loaded
await assertions.assertMetaTag({ property: 'og:title', content: 'My Post' })
await assertions.assertOpenGraphTags()
await assertions.assertHasHeadings()

// Navigation helpers
await navigation.assertLinkNavigation('About', /\/about/)
await navigation.goBack()

// Performance measurement
const metrics = await performance.assertBudget(PerformanceBudgets.static)
performance.printMetrics(metrics)

// Accessibility (axe-core)
await a11y.assertNoCriticalViolations({ disableRules: ['color-contrast'] })
These aren't clever abstractions — they're shortcuts for things you'd write over and over. The accessibility helper wraps @axe-core/playwright so you can run WCAG audits in a single line. The performance helper measures Web Vitals (TTFB, FCP, LCP, CLS) and asserts them against configurable budgets.
The image checker was actually an interesting problem to solve. On Chromium, checking naturalWidth > 0 works immediately. On Firefox and WebKit, lazy-loaded images (especially Next.js optimized ones) report naturalWidth as 0 because they haven't decoded yet. The fix was to scroll each image into view and wait for the load event before checking:
async assertNoImageErrors(): Promise<void> {
  const images = await this.page.locator('img').all();
  for (const img of images) {
    await img.scrollIntoViewIfNeeded();
    const naturalWidth = await img.evaluate((el) => {
      const imgEl = el as HTMLImageElement;
      if (imgEl.complete && imgEl.naturalWidth > 0) return imgEl.naturalWidth;
      return new Promise<number>((resolve) => {
        imgEl.onload = () => resolve(imgEl.naturalWidth);
        imgEl.onerror = () => resolve(0);
        setTimeout(() => resolve(imgEl.naturalWidth), 5000);
      });
    });
    const src = await img.getAttribute('src');
    expect(naturalWidth, `Image failed to load: ${src}`).toBeGreaterThan(0);
  }
}
Small detail, but this is exactly the kind of thing that breaks your CI at 3am and takes an hour to debug. Having it solved once in a helper means you never think about it again.
API Testing Without a Browser
Not everything needs a browser. The template includes an API layer built on axios for testing endpoints directly:
export class BlogApi {
  private readonly client: AxiosInstance

  constructor(baseURL?: string) {
    this.client = axios.create({
      baseURL: baseURL ?? EnvConfig.baseUrl,
      timeout: 15_000,
      validateStatus: () => true, // Never throw on status codes
    })
  }

  async checkPageExists(path: string): Promise<boolean> {
    const response = await this.client.get(path, { maxRedirects: 5 })
    return response.status >= 200 && response.status < 400
  }

  async getRssFeed(): Promise<ApiResponse<string>> {
    /* ... */
  }
  async getResponseHeaders(path: string): Promise<Record<string, string>> {
    /* ... */
  }
}
The validateStatus: () => true is intentional — it means axios never throws on HTTP errors, so you can assert on status codes explicitly in tests rather than catching exceptions. Makes tests much more readable.
API tests are fast because they skip browser rendering entirely. They're good for smoke-checking that pages return 200, RSS feeds are valid XML, and headers are set correctly.
Test Data Factory
Hardcoded test data is a trap. It makes tests brittle and hides assumptions. The template uses a factory pattern with faker.js:
test('search handles random queries @regression', async ({ homePage }) => {
  await homePage.navigate()
  const query = TestDataFactory.searchQuery() // Random word
  await homePage.navbar.search(query)
})

test('XSS payloads are handled safely @regression', async ({ homePage }) => {
  await homePage.navigate()
  for (const payload of TestDataFactory.xssPayloads()) {
    await homePage.navbar.search(payload)
    const title = await homePage.page.title()
    expect(title).not.toContain('xss')
    await homePage.navbar.clearSearch()
  }
})
The factory generates random search queries, fake blog slugs for 404 testing, XSS payloads for security tests, and viewport sizes for responsive testing. It keeps test data close to the tests that use it without coupling them to specific values.
The Tagging Strategy
Every test in the template is tagged as either @sanity or @regression:
test('should display hero heading @sanity', async ({ homePage }) => {
  /* ... */
})
test('clicking Explore Articles navigates to blogs @regression', async ({
  homePage,
}) => {
  /* ... */
})
This isn't just for organization — it drives the CI pipeline. Sanity tests are the critical path: page loads, core navigation, the things that must work. They run first, and if they fail, regression tests are skipped entirely. No point running 73 regression tests when the homepage doesn't load.
The current split is 28 sanity tests that run in about 8 seconds and 73 regression tests that cover edge cases, SEO, performance, accessibility, and security.
CI Pipeline
The GitHub Actions workflow has four stages:
Sanity (3 browsers) → Regression (3 shards × 3 browsers) → Report (merge + GitHub Pages) → Summary
Sanity runs fast across chromium, firefox, and webkit. If any browser fails, regression is skipped entirely (fail-fast: true).
Regression shards tests across 3 workers per browser — that's 9 parallel jobs. Sharding is important because regression tests include things like performance budgets and accessibility scans that are inherently slower. Running everything sequentially on a single runner would take several minutes. With sharding, it's typically under a minute.
The sharding required adding the blob reporter to the Playwright config. Without it, playwright merge-reports has nothing to merge — a lesson I learned the hard way when CI reports kept failing to deploy:
reporter: [
  ['html', { outputFolder: 'playwright-report', open: 'never' }],
  ['list'],
  ...(process.env.CI ? [['github'], ['blob']] : []),
],
Report merges all blob reports from the sharded runs into a single HTML report and deploys it to GitHub Pages. Every CI run produces a browsable report with traces, screenshots, and video for failures.
Summary writes a GitHub Step Summary with a status table and a direct link to the Pages report. It's a small thing, but it saves time when you're scanning through notifications at 7am.
The workflow triggers on PRs to master, nightly at 04:00 UTC, and manual dispatch with a configurable base URL.
There's also a separate static-checks.yml that runs ESLint, Prettier, and TypeScript type checking on every push. These are fast and cheap — there's no reason not to run them on every commit.
Logging
All scripts use winston instead of console.log. This might seem like overkill for a test framework, but structured logging with timestamps and log levels makes debugging CI failures significantly easier. When you're staring at a wall of CI output trying to figure out what happened, having 14:23:05 [ERROR] Failed to send Slack notification: 403 is much more useful than a bare string.
The logger is configured via LOG_LEVEL environment variable, so you can crank it up to debug when investigating issues without changing code.
Scripts: Slack and LLM Analysis
The template includes two optional scripts for CI integration:
Slack Notifier reads the Playwright JSON report and sends a formatted Block Kit message with test results. Without a webhook URL configured, it prints the payload to the logger — useful for testing the format before hooking it up.
LLM Failure Analyzer reads error context files from test-results/ and sends them to Claude or OpenAI for root-cause analysis. It categorizes failures as test issues (bad selectors), app issues (regressions), or environment issues (timeouts). Without an API key, it falls back to local pattern matching that handles the common cases.
Both are wired into the custom reporter but disabled by default. Uncomment one line in the Playwright config to enable them:
reporter: [
  ['./scripts/custom-reporter.ts', { slack: true, llmAnalysis: true }],
],
How to Use This Template
The template is built against my blog (kazis.dev) but it's designed to be adapted. The process is:
- Update
BASE_URLin your.envorconfig/env.config.ts - Update routes in
constants/routes.enum.ts - Create page objects by extending
BasePage - Register them in
fixtures/base.fixture.ts - Write tests
That's it. The helpers, components, CI pipeline, reporters, and tagging strategy all carry over. You're not adopting a framework — you're forking a working setup and adjusting the page objects to match your app.
What I Intentionally Left Out
- Visual regression testing. Playwright supports screenshot comparison, but it adds complexity (baseline management, flaky diffs from font rendering) that most teams don't need initially.
- Database seeding. This template tests against a live URL. If you need to seed data, add it to the fixtures — the pattern supports it, but the implementation is app-specific.
- Authentication flows. Same reasoning — the storage state pattern varies too much between apps to include a generic version.
- Docker. The CI runs directly on GitHub runners. If you need containerized execution, wrapping it in Docker is straightforward but adds a layer I didn't want to bake in.
These are all things you might add, but starting without them keeps the template focused on what's universal: structure, patterns, and CI.
Final Thoughts
The best test frameworks are the boring ones. They use well-known patterns, they're easy to navigate for someone who didn't write them, and they get out of the way so you can focus on what actually matters — writing good tests.
This template is the result of building the same thing several times and finally writing it down. If it saves you a few days of setup, or if it gives you ideas for organizing your own suite, that's a win.
Check it out: github.com/Kazaz-Or/playwright-ts-template-pom